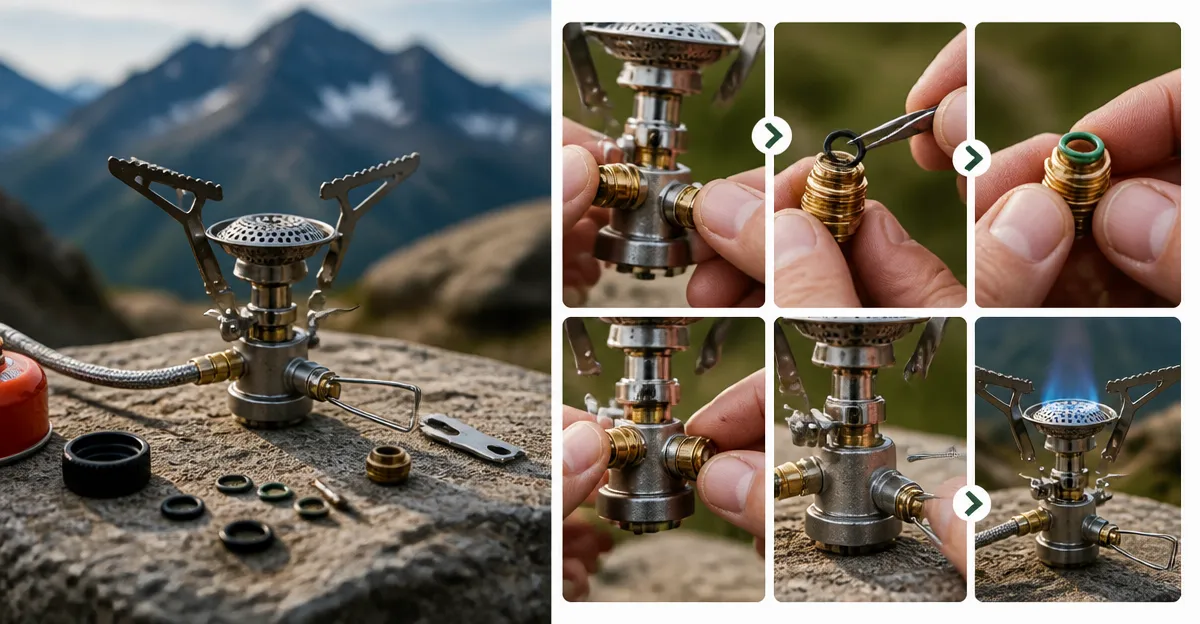
How to Replace an O‑Ring on a Backpacking Stove: Quick Step‑by‑Step Field Repair Guide
Introduction
Backpacking enthusiasts understand that a reliable stove is essential for warm meals and safe hydration. When the O‑ring that seals the fuel connection fails, the stove may leak, sputter, or refuse to ignite. This guide teaches the reader how to replace an O‑ring in the field, ensuring the stove returns to full performance without expensive service trips. By following each step, one can avoid dangerous fuel leaks, extend the life of the stove, and maintain confidence during remote adventures.
The instructions are applicable to most canister‑type stoves, including popular models such as the AOTU Portable Camping Stove, the MSR PocketRocket 2, and the BRS‑3000T Titanium Camping Stove. Even if the reader owns a different brand, the principles remain the same.
What You’ll Need
- Replacement O‑ring (compatible size for the stove model)
- Small flat‑head screwdriver or a plastic spudger
- Cleaning cloth or lint‑free rag
- Isopropyl alcohol (optional, for thorough cleaning)
- Lightweight gloves to protect hands from fuel residue
For hikers who prefer to keep a spare stove as a backup, the AOTU Portable Camping Stove offers an ultra‑light solution at $11.99, rated 4.6/5 by over 6,500 users. Its compact size (4×5×8 cm) makes it an ideal practice platform for repair drills.
Step 1 – Ensure Safety and Prepare the Work Area
Before handling any fuel‑related component, one must work in a well‑ventilated area away from open flames. Lay the stove on a stable, non‑flammable surface such as a metal tray or a rock. Disconnect the fuel canister by unscrewing it counter‑clockwise; store the canister in a cool, upright position to prevent accidental discharge.
Wearing lightweight gloves protects skin from residual fuel and reduces the risk of slipping while manipulating small parts. If possible, keep a small fire‑extinguishing tablet nearby as an extra precaution.
Why this matters: A loose or leaking O‑ring can release pressurized gas, which is hazardous in confined spaces. Proper preparation eliminates the chance of ignition during the repair.
Step 2 – Remove the Faulty O‑Ring
Locate the O‑ring seated in the valve interface where the stove connects to the canister. Using a small flat‑head screwdriver or a plastic spudger, gently pry the O‑ring away from its groove. Do not apply excessive force; the ring is designed to be flexible but can tear if twisted.
Collect the old O‑ring in a clean container to avoid losing it. If the ring appears cracked, flattened, or hardened, it must be replaced. The MSR PocketRocket 2 users often find that the O‑ring is the most common wear point after 200‑300 hours of use, as reflected by its 4.8/5 rating from 4,276 reviewers.
Why this product is useful: The PocketRocket’s simple valve design makes O‑ring access straightforward, allowing beginners to practice removal without complex disassembly.
Step 3 – Clean the Seating Area
Residue from fuel, dust, or previous O‑ring material can prevent a proper seal. Wipe the groove with a lint‑free cloth dampened with isopropyl alcohol. Rotate the valve a few times to ensure the alcohol reaches all surfaces, then allow the area to air‑dry for at least 30 seconds.
If the user does not have alcohol, a mild soap solution followed by a thorough rinse works adequately. The key is to leave the surface dry and free of particles.
Why cleaning matters: Even microscopic debris can create a leak path, reducing fuel efficiency and potentially causing flame instability during high‑altitude cooking.
Step 4 – Inspect and Prepare the New O‑Ring
Take the replacement O‑ring and compare its dimensions to the original. The correct size is critical; an oversized ring will not seat fully, while an undersized ring will roll out under pressure. Many manufacturers sell O‑ring kits specific to their models; for the BRS‑3000T Titanium Camping Stove, a 25 g titanium‑alloy stove, a standard 7/16 inch O‑ring is required.
\nThe BRS‑3000T is praised for its 2700 W output and minimal weight (25 g). Its simple valve design makes O‑ring replacement a quick task, as noted by its 4.6/5 rating from 3,910 reviewers.
Lubricate the new O‑ring lightly with a thin layer of food‑grade silicone grease if desired. This reduces friction during installation and helps maintain a seal under temperature fluctuations.
Step 5 – Install the New O‑Ring
Place the new O‑ring into the groove, ensuring it sits evenly around the entire circumference. Use your fingertip to press it gently into place; the ring should sit flush without any gaps. Rotate the valve a few times to verify that the O‑ring remains seated.
Re‑attach the fuel canister by screwing it clockwise until it clicks. Do not overtighten, as excessive torque can deform the O‑ring or damage the valve threads.
Why this step is decisive: A correctly installed O‑ring restores the sealed pathway required for consistent fuel flow, eliminating leaks and ensuring the stove reaches its rated heat output (e.g., 3000 W for the AOTU model).
Step 6 – Test the Stove
With the canister attached, open the valve slowly while listening for a steady hiss. Ignite the stove using the built‑in piezo igniter or a lighter. Observe the flame for stability; a uniform blue‑white flame indicates a proper seal.
If the flame flickers or the stove emits a hissing sound without ignition, close the valve, re‑inspect the O‑ring position, and repeat the cleaning step. For the Fire‑Maple Greenpeak 1 Stove, users report reliable ignition even in windy conditions, thanks to its built‑in windscreen and 85 g weight.
After confirming stable operation, the stove is ready for back‑country use. Record the repair date in a gear log to track future maintenance intervals.
Tips & Pro Tips
- Carry a spare O‑ring of the correct size in a small zip‑lock bag; replacement takes less than five minutes when you have the part on hand.
- When cooking at high altitude, fuel pressure drops; a fresh O‑ring helps maintain the pressure needed for rapid boiling.
- Use a small piece of tape to label the canister and stove model; this simplifies future part identification.
- Apply a thin coat of silicone grease only if the manufacturer recommends it; some stoves perform best with a dry O‑ring.
- Perform a leak test by submerging the valve connection in water and looking for bubbles after the stove is assembled but before ignition.
Troubleshooting
| Problem | Possible Cause | Solution |
|---|---|---|
| Leak after installation | O‑ring mis‑aligned or damaged | Remove the ring, clean the groove, and reinstall a new, undamaged O‑ring. |
| Flame sputters | Partial blockage in fuel line | Detach the canister, blow through the valve to clear debris, then reattach. |
| Igniter does not spark | Battery depleted or igniter contacts dirty | Replace the battery (if applicable) or clean contacts with a cotton swab. |
Conclusion
Replacing an O‑ring on a backpacking stove is a straightforward field repair that restores fuel efficiency, safety, and cooking performance. By following the six steps outlined—preparing a safe workspace, removing the old ring, cleaning, inspecting, installing a new O‑ring, and testing—the reader can confidently address one of the most common stove failures. Keeping a spare O‑ring and a lightweight repair kit, such as the AOTU Portable Camping Stove, ensures that future trips remain uninterrupted.
Regular maintenance, combined with the pro tips provided, will extend the lifespan of any canister stove, allowing the adventurer to focus on the trail rather than equipment worries.
Products Mentioned in This Guide
Frequently Asked Questions
How can I tell if the O‑ring on my backpacking stove needs replacement?
If you notice fuel leaks, sputtering, or difficulty igniting, the O‑ring is likely worn or damaged.
What tools are required to replace an O‑ring in the field?
A small flat‑head screwdriver or pocket knife and a replacement O‑ring that matches your stove model.
What are the step‑by‑step instructions for swapping the O‑ring on a canister stove?
1) Cool and turn off the stove; 2) Remove the fuel connector; 3) Pry out the old O‑ring; 4) Clean the groove; 5) Install the new O‑ring; 6) Reattach the connector and test for leaks.
Can I use any O‑ring material, or should I match the original specification?
Use the same material and size as the original (typically silicone or nitrile) for proper sealing and heat resistance.
How do I prevent future O‑ring leaks after replacement?
Keep the O‑ring clean, avoid over‑tightening connections, and store the stove dry to minimize wear.