Introduction
This guide will teach the reader how to prepare a satisfying trail pizza while backpacking, using lightweight titanium cookware and simple ingredients. The reader will learn how to set up a compact cooking station, assemble a dough base, and achieve a golden crust on a high‑efficiency stove. Understanding these techniques adds variety to backcountry meals and reduces reliance on heavy, pre‑packaged foods. The knowledge gained will improve confidence during multi‑day hikes and enhance the overall outdoor experience.
What You’ll Need
- Odoland Titanium Camping Cookware 750ML set (pot, stove, spork, mesh bag)
- Pre‑measured trail pizza dough or homemade flour‑water mix
- Dehydrated pizza sauce packets
- Shelf‑stable cheese (such as grated parmesan or powdered mozzarella)
- Optional toppings: dried herbs, sun‑dried tomatoes, cured meat slices
- Lightweight cutting board and small knife
All of the essential gear can be sourced from the products listed at the end of this article.
Step 1: Prepare Ingredients
Begin by rehydrating the dehydrated pizza sauce according to the package instructions; typically one part water to one part sauce powder. While the sauce absorbs water, combine the trail dough mix with the recommended amount of water in a clean bowl. Stir until the mixture forms a pliable ball; this usually takes two to three minutes of vigorous mixing. The dough should be soft enough to roll thinly but sturdy enough to hold toppings without tearing.
For those who prefer a homemade flour‑water blend, use a 2:1 ratio of flour to water and add a pinch of salt. The addition of a small amount of oil (such as a teaspoon of olive oil) improves elasticity and prevents sticking on the titanium surface. Once the dough is ready, set it aside in a resealable bag to retain moisture.
Step 2: Set Up the Cooking Station
Unfold the Odoland Titanium Camping Cookware set on a flat, fire‑safe surface. The 1900W titanium stove provides rapid heat transfer, allowing water to boil within minutes and the pan to reach cooking temperature quickly. Attach the foldable handles to the pot and secure the mesh bag for easy transport.
Place a lightweight, heat‑resistant cutting board beside the stove to serve as a workspace. Ensure that the wind is blocked using natural barriers such as rocks or a portable windscreen; the titanium stove’s efficiency can be reduced by strong gusts, leading to uneven cooking.
Step 3: Prepare the Titanium Pan
Insert the titanium pot lid upside down to act as a makeshift skillet; the pot’s smooth interior functions as a non‑stick surface when lightly oiled. Apply a thin layer of cooking oil using the spork included in the Odoland set; this prevents the dough from adhering and promotes a crisp crust. The 750 ml capacity is ample for a personal‑size pizza, typically 8‑10 inches in diameter.
Pre‑heat the pan on the stove for approximately one minute. The titanium’s rapid heating properties mean that the pan will be uniformly hot, which is essential for achieving a golden bottom without burning the toppings.
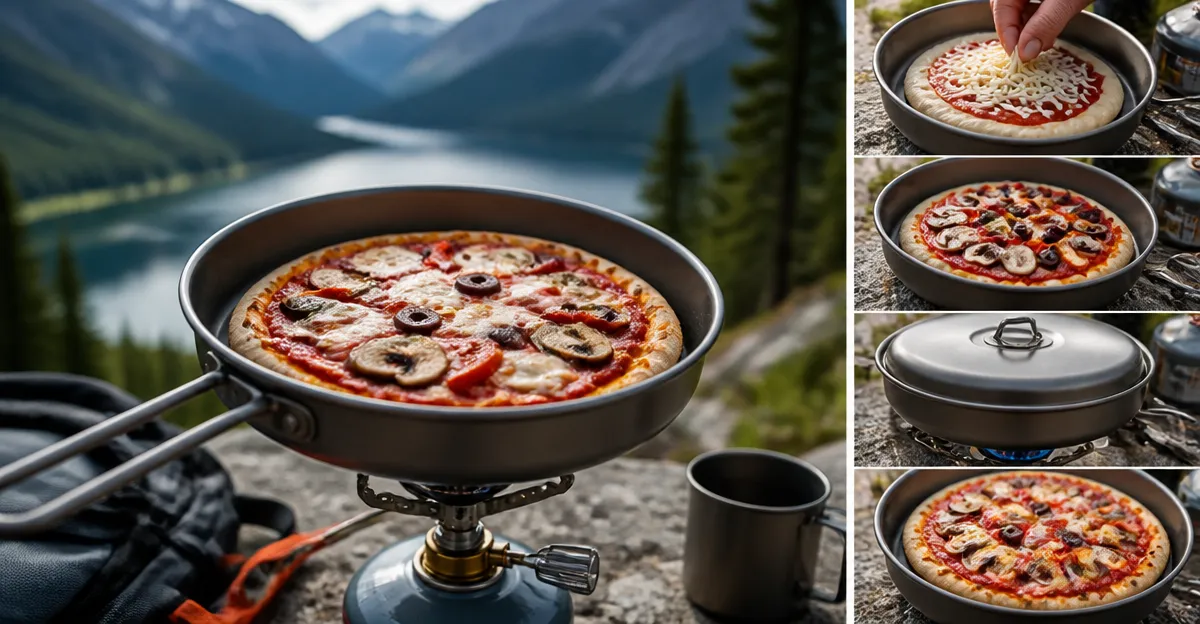
Step 4: Assemble the Pizza Base
Transfer the dough onto the pre‑heated pan and gently press it outward with the spork until it covers the surface evenly. Aim for a thickness of about ¼ inch; this balance yields a crust that is both tender inside and crisp outside. Immediately spread a thin layer of rehydrated sauce over the dough, leaving a small border for the crust.
Sprinkle the shelf‑stable cheese evenly, then add any optional toppings. Because the cooking time is short, it is advisable to use lightweight, pre‑dried ingredients that rehydrate quickly, such as sun‑dried tomatoes or thin slices of cured meat. Overloading the pizza can cause uneven cooking and soggy spots.
Step 5: Cook the Pizza
Cover the pan with the pot lid to trap heat, creating an oven‑like environment. Allow the pizza to cook for three to four minutes, checking the crust after the third minute. The titanium pan’s excellent heat conductivity ensures that the bottom crisps while the cheese melts evenly.
If the cheese has not melted to satisfaction, briefly remove the lid and rotate the pan to expose the surface to direct flame for an additional 30 seconds. This technique mimics the broiling function of a traditional oven and yields a bubbly, golden cheese layer.
Step 6: Finish and Serve
When the crust is golden and the cheese exhibits a light caramelization, remove the pan from the stove using the foldable handles. Allow the pizza to rest for one minute; this permits the cheese to set slightly, making it easier to slice. Use the spork or a lightweight knife to cut the pizza into wedges.
Serve the pizza directly from the pan or transfer it onto a compact plate. Pair the meal with a hot beverage prepared using the same titanium cookware; the versatility of the Odoland set makes it an all‑in‑one solution for breakfast, lunch, and dinner in the backcountry.
Tips & Pro Tips
- Pre‑measure all dry ingredients before departure to reduce the need for measuring devices on the trail.
- Store the cheese in a vacuum‑sealed pouch to extend shelf life and prevent moisture loss.
- Use the Recipes for Adventure II book for additional quick‑cook meals that complement trail pizza.
- When cooking at high altitude, increase the stove’s fuel flow slightly to compensate for lower boiling points.
- Carry a small silicone brush to apply oil evenly; this ensures a uniform non‑stick surface.
Troubleshooting
- Crust sticks to pan: Ensure the pan is lightly oiled and pre‑heated before adding dough.
- Pizza burns on the bottom: Reduce stove flame slightly and lift the pan off direct flame using the mesh bag as a buffer.
- Cheese does not melt: Increase cooking time by 30 seconds with the lid removed, allowing direct heat to act on the cheese.
Conclusion
The reader now possesses a complete method for creating a delicious trail pizza using a lightweight titanium pan and portable stove. By following the step‑by‑step instructions, selecting appropriate gear, and applying the provided tips, one can enjoy a gourmet‑style meal without sacrificing pack weight. The techniques outlined also translate to other backpacking recipes, expanding culinary possibilities on the trail.
Products Mentioned in This Guide
Frequently Asked Questions
What lightweight cookware is best for making trail pizza?
A 750 ml titanium pot set, like the Odoland Titanium Camping Cookware, provides a durable, low‑weight cooking surface ideal for a stovetop pizza.
How do I rehydrate dehydrated pizza sauce on the trail?
Mix the sauce packet with water at a 1:1 ratio (or per package directions) and stir until fully dissolved, usually in a few minutes.
Can I use homemade dough instead of pre‑measured trail pizza dough?
Yes, combine flour and water in a 2:1 ratio, let it rest in a sealed bag, and roll it thin before cooking in the titanium pan.
What cheese works best for backpacking pizza?
Shelf‑stable options like grated parmesan or powdered mozzarella melt well and won’t spoil without refrigeration.
How do I achieve a golden crust on a high‑efficiency stove?
Preheat the titanium pan on medium heat for 1‑2 minutes, then cook the dough with a lid on to trap steam and finish with a brief uncovered crisp.