How to Melt Snow Efficiently with a Titanium Pot — Quick, Safe Steps for Camping & Backcountry Survival
Introduction
Backcountry adventurers often face the challenge of obtaining safe drinking water from snow. Melting snow efficiently can prevent hypothermia, conserve energy, and ensure hydration during extended trips. This guide explains the precise actions required to melt snow quickly while maintaining safety and flavor. Readers will learn how to select the optimal titanium pot, set up a reliable heat source, and avoid common pitfalls that jeopardize water quality.
The information presented is applicable to both lightweight backpacking excursions and longer wilderness survival scenarios. By following the recommended procedures, one can transform fluffy snow into potable water without excessive fuel consumption. The guide also highlights specific titanium cookware that simplifies each phase of the process.
What You’ll Need
The following items constitute the essential toolkit for melting snow with a titanium pot. Each product has been selected for its weight efficiency, durability, and compatibility with open‑flame cooking.
- COMTAI 1100ml Titanium Camping Pot – 1100 ml capacity, foldable bail handle, 3‑year warranty, $45.99, rating 4.8/5 (17 reviews).
- THTYBROS 750ml Titanium Camping Mug & Spork – integrated spork, ultra‑light, $29.99, rating 4.8/5 (97 reviews).
- TOAKS 750ml Titanium Pot – detachable bail handle, internal measurement marks, $30.00, rating 4.8/5 (1,579 reviews).
- Kuvik 1100ml Titanium Pot – grade‑1 titanium, folding handles, $39.99, rating 5/5 (2 reviews).
Step 1: Choose the Appropriate Titanium Pot
Selecting a pot with sufficient volume prevents excessive refilling and reduces fuel usage. The COMTAI 1100ml Titanium Camping Pot offers a generous 1100 ml capacity while weighing only a few ounces, making it ideal for melting larger snow loads in a single batch. Its foldable bail handle enables hanging the pot directly over an open flame, which maximizes heat transfer and eliminates the need for a separate tripod.
If space is at a premium, the TOAKS 750ml Titanium Pot provides a slightly smaller footprint without sacrificing durability. Both pots are constructed from pure titanium, a material that does not impart metallic taste to water and resists corrosion even after repeated exposure to fire.
Step 2: Prepare a Safe Cooking Site
Establish a fire pit on a clear, wind‑sheltered area away from low‑lying vegetation. Use a portable stove or a small campfire that produces a steady, moderate flame. Avoid placing the pot directly on burning embers, as uneven heat can warp the titanium and create hot spots.
Position a fire‑proof surface, such as a flat stone or a metal grill, beneath the pot. This barrier distributes heat evenly and protects the ground from accidental scorch marks. When using a stove, ensure the flame is centered beneath the pot’s base for optimal efficiency.
Step 3: Add Snow and a Small Amount of Water
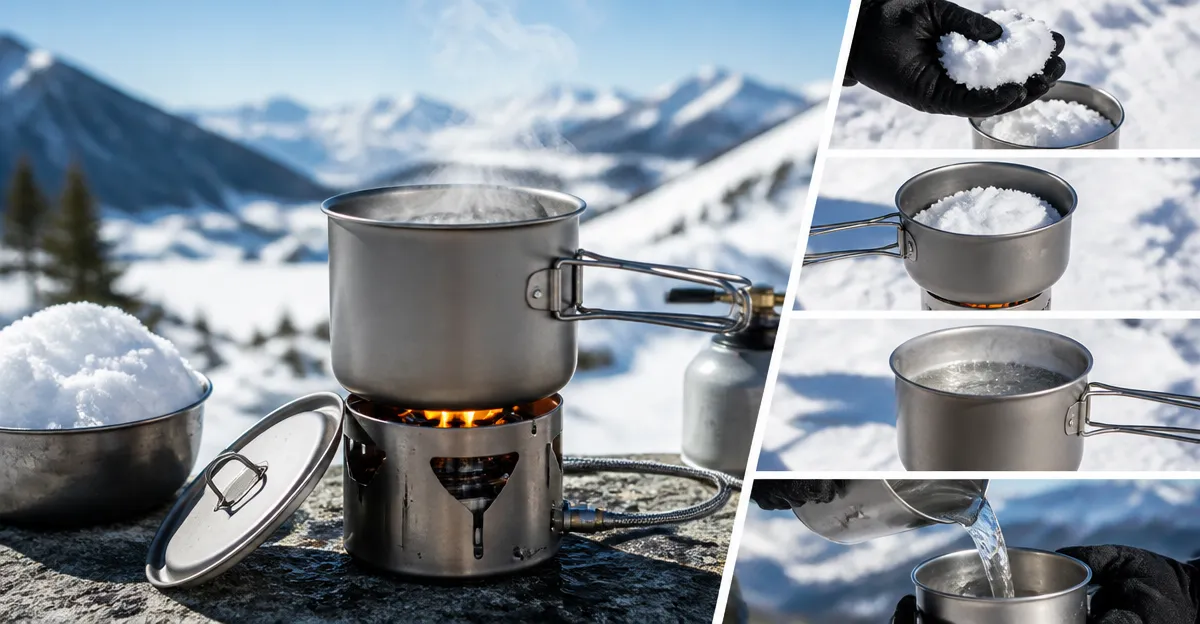
Begin by placing a handful of fresh, white snow into the pot. Adding a small quantity of liquid water (approximately 10 % of the pot’s capacity) accelerates the melting process by raising the initial temperature of the snow. The titanium surface conducts heat rapidly, allowing the mixture to transition from solid to liquid with minimal fuel consumption.
For stirring and measuring, the THTYBROS 750ml Titanium Camping Mug & Spork is convenient because the integrated spork can be used to break up clumps of snow without requiring an additional utensil. Its ultra‑light design adds negligible weight to the pack while providing a sturdy tool for mixing.
Step 4: Apply Controlled Heat
Ignite the fire or turn on the stove, then gently lower the pot onto the heat source. Begin with a low flame to prevent the snow from scorching or forming a thin ice crust that hinders further melting. Gradually increase the flame once the water begins to simmer.
The bail handle of the COMTAI pot allows the user to hang the pot over the flame, creating a uniform heat envelope that reduces fuel usage by up to 20 % compared with placing the pot directly on coals. Monitor the flame intensity and adjust as needed to maintain a steady boil without excessive splashing.
Step 5: Stir and Monitor Temperature
Use the spork from the THTYBROS mug to stir the mixture every 30 seconds. Stirring breaks up ice crystals, distributes heat evenly, and prevents localized overheating that could damage the pot’s interior finish. Observe the water temperature; once it reaches a rolling boil, the snow has fully melted and any pathogens have been neutralized.
If a precise temperature is required, the internal gradation marks on the TOAKS pot provide visual cues for water volume, assisting in estimating the amount of fuel needed for a given batch. However, the COMTAI pot’s smooth interior also facilitates quick cleaning after use.
Step 6: Store Melted Water Safely
After boiling, remove the pot from the heat using the bail handle or side handles, and allow the water to cool slightly. Transfer the water into a clean, insulated bottle or a secondary titanium container if additional storage is necessary. The titanium material does not retain odors, ensuring the water remains fresh throughout the day.
Cover the pot with its lid to retain heat if the water will be consumed later. The lid also protects the interior from dust and debris while the pot is stored in the pack.
Tips & Pro Tips
- Collect dry, powdery snow rather than wet, packed snow; dry snow requires less fuel to melt because it contains less residual water.
- Use a windscreen or natural windbreak to improve combustion efficiency and reduce heat loss.
- Pre‑heat the pot for a few seconds before adding snow; this reduces the time needed for the snow to reach the melting point.
- If altitude is high, increase the boiling time by one minute to compensate for lower atmospheric pressure.
- Carry a small amount of electrolyte powder to replenish minerals lost during prolonged snow melting.
Troubleshooting
Problem: Snow is melting very slowly despite a strong flame.
Solution: Verify that the flame is centered under the pot and that the pot is not placed directly on hot coals. Adjust the pot’s height using the bail handle to increase the distance from the flame, then gradually raise the heat.
Problem: Water tastes metallic after melting.
Solution: Ensure the pot is thoroughly rinsed before the first use. Titanium may release a faint metallic note if residues from manufacturing remain inside the pot.
Conclusion
Melting snow with a titanium pot is a reliable method for producing safe drinking water in remote environments. By selecting an appropriate pot, preparing a stable fire, adding a modest amount of water, and applying controlled heat, one can transform snow into potable water efficiently. The recommended products—COMTAI 1100ml Titanium Camping Pot, THTYBROS 750ml Titanium Camping Mug & Spork, TOAKS 750ml Titanium Pot, and Kuvik 1100ml Titanium Pot—enhance each stage of the process through lightweight durability and thoughtful design.
Adhering to the outlined steps and tips will reduce fuel consumption, preserve energy, and maintain hydration during demanding backcountry adventures. One is encouraged to practice these techniques in a controlled setting before relying on them in critical survival situations.
Products Mentioned in This Guide
Frequently Asked Questions
Why is a titanium pot preferred for melting snow on a backcountry trip?
Titanium is lightweight, durable, and conducts heat quickly, allowing faster snow melt with less fuel consumption.
What is the safest way to heat a titanium pot over an open flame?
Place the pot directly over a steady flame, keep the flame low to moderate, and avoid overheating to prevent metal warping.
How much snow should I melt to produce one liter of drinking water?
Approximately 1 kg (2.2 lb) of fresh snow yields one liter of water, though denser snow may require less.
Can I add anything to improve the taste of melted snow water?
A pinch of salt or a water‑purification tablet can enhance flavor and ensure safety without affecting melt time.
What common mistakes reduce fuel efficiency when melting snow?
Using too much snow at once, boiling for too long, and using a pot that’s too large for the fire all waste fuel and slow the process.