How to Prevent Carbon Monoxide Poisoning from Using a Backpacking Stove Inside a Tent: Safety, Ventilation & Detection
Introduction
Backpacking enthusiasts often cherish the convenience of cooking a hot meal inside a tent, especially when weather conditions are unfavorable. However, burning fuel in an enclosed space creates carbon monoxide (CO), a colorless and odorless gas that can cause severe health issues or even death. This guide explains the essential safety measures, proper ventilation techniques, and reliable detection methods that allow one to enjoy stove cooking without risking CO poisoning. By following the steps outlined below, readers will acquire practical knowledge that protects themselves and their companions during wilderness adventures.
What You’ll Need
- Backpacking stove compatible with the chosen fuel (e.g., canister, liquid fuel).
- Fuel canisters or bottles appropriate for the stove.
- Fire‑resistant cooking surface or stove mat.
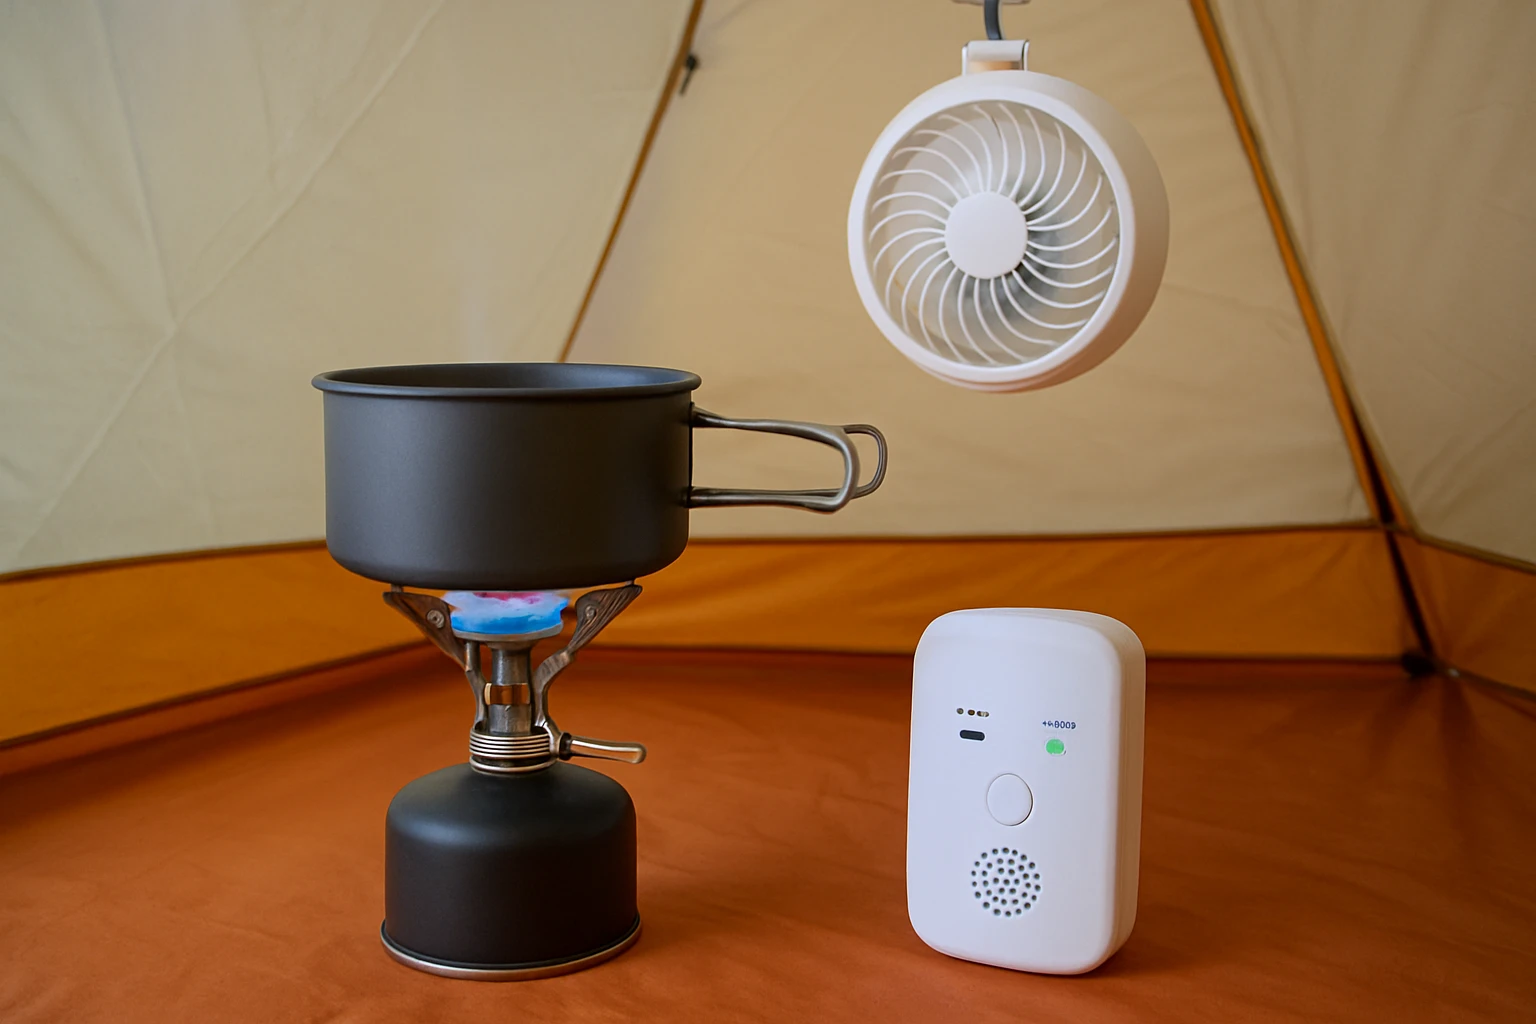
- Ventilation aid such as a portable fan.
- Battery‑powered carbon monoxide detector designed for outdoor use.
- Protective gloves and eye protection.
- First‑aid kit and emergency contact plan.
Among the ventilation aids, the Fialame Portable Ceiling Fan offers a lightweight, rechargeable solution that enhances airflow while providing a dimmable LED light for night‑time cooking.
Step 1: Select a Low‑Emission Stove and Appropriate Fuel
The first line of defense against CO buildup is choosing a stove that burns fuel efficiently and produces minimal carbon monoxide. Canister stoves that use isobutane‑propane blends typically generate lower CO levels than liquid‑fuel models because they maintain more complete combustion. Verify that the stove’s manufacturer lists CO emissions and select a model with a reputation for clean burn. Additionally, use fresh, high‑quality fuel; old or contaminated fuel can cause incomplete combustion, increasing CO output.
Before lighting the stove, inspect the burner, fuel line, and regulator for damage. A cracked regulator may leak fuel, leading to an unstable flame and higher CO production. Replace any compromised components with manufacturer‑approved parts.
When setting up the stove inside the tent, place it on a fire‑resistant mat to protect the tent fabric and to provide a stable base. This also helps concentrate heat upward, reducing the likelihood of hot spots that could ignite the tent material.
Finally, keep the stove away from the tent walls and any sleeping gear. Maintaining a clear perimeter of at least 30 cm (12 in) ensures that heat does not accumulate near flammable surfaces.
Step 2: Establish Effective Ventilation Using a Portable Fan
Even the most efficient stove requires fresh air to disperse combustion gases. Natural ventilation through a tent’s vents or doors may be insufficient, especially in cold weather when one tends to close openings to retain heat. A portable fan can actively move stale air out and draw fresh air in, dramatically lowering CO concentration.
The Fialame Portable Ceiling Fan is specifically designed for outdoor use. Its 9.25‑inch blades weigh only 390 g, making it easy to carry in a backpack. The fan offers four wind speeds, with the lowest settings operating almost silently—ideal for maintaining a calm campsite while still providing airflow.
Its built‑in LED night light offers three brightness levels, allowing one to illuminate the cooking area without additional lanterns. The fan runs on a 7200 mAh rechargeable battery, delivering up to 10 hours of cooling or 20 hours of lighting after a 4‑6 hour charge. The remote control and timer functions enable hands‑free operation, letting the user set a ventilation period of 2, 4, 6, or 8 hours and then focus on meal preparation.
To use the fan effectively, hang it from the tent ceiling or a nearby hook, direct the airflow toward the stove, and open a small vent or zippered door opposite the fan. This creates a cross‑draft that pushes CO‑laden air out while pulling fresh air in, mimicking the ventilation achieved by a window in a cabin.
Step 3: Deploy a Carbon Monoxide Detector
A carbon monoxide detector provides the most reliable warning that CO levels are approaching dangerous thresholds. Choose a detector that is battery‑powered, lightweight, and rated for outdoor environments. Devices with digital displays and audible alarms are preferable because they give clear, actionable alerts.
Place the detector at breathing height—approximately 1.2 to 1.5 m (4 to 5 ft) above the ground—and at least 30 cm (12 in) away from the stove to avoid false alarms caused by transient spikes. Ensure the detector’s battery is fresh before each trip; many models beep when the battery is low, allowing one to replace it before departure.
Test the detector before use by pressing the test button; a loud, distinct tone should sound. Some detectors also feature a “low‑level alarm” that vibrates or flashes, providing a subtle warning during nighttime when the main alarm could disturb sleep.
If the alarm sounds, immediately extinguish the stove, open all tent vents, and exit the tent to obtain fresh air. Seek medical attention if any symptoms of CO poisoning—headache, dizziness, nausea, or confusion—appear.
Step 4: Monitor and Maintain Air Quality Throughout Cooking
Even with a fan and detector in place, continuous monitoring is essential. Keep the stove flame blue and steady; a yellow or sputtering flame indicates incomplete combustion and higher CO production. Adjust the fuel flow or clean the burner if the flame becomes irregular.
Periodically check the fan’s battery level using its indicator light. If the battery drops below 20 %, recharge it at the next opportunity or replace it with a spare power bank. The fan’s timer can be set to automatically shut off after the cooking session, conserving battery life.
Maintain a clear line of sight between the stove and any vent openings. Do not block vents with gear, sleeping bags, or clothing, as this restricts airflow and can cause CO to accumulate.
Finally, record the duration of stove use and the number of ventilation cycles performed. This log helps evaluate whether the current setup meets safety standards and informs adjustments for future trips.
Step 5: Prepare for Emergencies
Despite careful preparation, emergencies can occur. Establish a clear emergency plan that includes the nearest evacuation route, contact numbers for local emergency services, and a method for signaling for help (e.g., whistle, satellite messenger).
Carry a compact first‑aid kit that includes oxygen masks or supplemental oxygen if you are traveling in high‑altitude regions where CO effects are amplified. Having a spare battery for the CO detector and fan ensures that both devices remain operational in a crisis.
Practice the “stop, breathe, exit” protocol: stop using the stove, breathe fresh air outside the tent, and exit the tent immediately if the CO alarm sounds. This habit reduces exposure time and improves outcomes.
After an incident, inspect all equipment for damage. Replace any broken stove components, fan blades, or detector units before the next outing to prevent recurrence.
Tips & Pro Tips
- Use a windscreen or stove shield to direct heat upward and away from the tent floor, reducing the amount of CO that settles near sleeping areas.
- When weather permits, briefly open the tent fully between cooking sessions to purge residual gases.
- Consider a dual‑fan setup: one fan for intake (pulling fresh air in) and the Fialame fan for exhaust (pushing air out).
- Carry a spare USB cable and power bank; the Fialame fan charges via USB, making recharging convenient with solar panels or portable chargers.
- Test the CO detector in a controlled environment by exposing it to a low‑level CO source (e.g., a lit candle) to verify alarm sensitivity.
Troubleshooting
| Problem | Possible Cause | Solution |
|---|---|---|
| Fan does not turn on | Battery depleted or remote malfunction | Charge the fan using the supplied USB cable; replace the remote battery if applicable. |
| CO alarm sounds repeatedly | Poor ventilation or faulty stove | Increase fan speed, open additional vents, and inspect the stove for clogs or fuel leaks. |
| LED light is dim | Low battery or incorrect brightness setting | Press the light button repeatedly to cycle brightness levels; recharge battery. |
| Remote control stops working | Interference or dead batteries | Replace remote batteries; ensure no metal objects obstruct the signal. |
Conclusion
Cooking inside a tent can be a comfortable and enjoyable experience when safety measures are rigorously applied. By selecting a low‑emission stove, establishing active ventilation with tools such as the Fialame Portable Ceiling Fan, deploying a reliable carbon monoxide detector, and adhering to vigilant monitoring practices, one dramatically reduces the risk of CO poisoning. The steps presented empower backpackers to make informed decisions, respond promptly to hazards, and maintain a healthy environment for themselves and their companions.
Products Mentioned in This Guide
Frequently Asked Questions
Is it safe to use a backpacking stove inside a tent?
Only if you provide adequate ventilation and use a CO detector; otherwise the risk of carbon monoxide poisoning is high.
How can I ventilate my tent while cooking with a stove?
Open a vent or window and use a portable fan to create a steady flow of fresh air through the cooking area.
What type of carbon monoxide detector should I bring on a backpacking trip?
Choose a lightweight, battery‑powered detector rated for outdoor use and capable of alerting at low CO levels.
How long should I wait after cooking before re‑entering the tent?
Wait until the stove is completely cool and the tent has been aired out for several minutes, ensuring CO levels have dissipated.
What are the signs of carbon monoxide poisoning while camping?
Common symptoms include headache, dizziness, nausea, and confusion; leave the tent immediately if they appear.